Summary
- HTC Vive is not detected or does not respond
- HTC Vive has an audio problem
- HTC Vive: tracking of Lighthouse stations does not work correctly
- Check that your Lighthouse stations are set up correctly
- Check that Lighthouse stations are installed securely
- Setting up channels for HTC Vive Lighthouse stations
- Perform a new HTC Vive gaming space calibration
- Reduce the camera quality of HTC Vive
- Optical synchronization issues between Lighthouse stations
- What do the different colors of the LEDs of the Lightouse stations mean?
- How do I synchronize Lighthouse stations using a cable?
- HTC Vive: Vive Wands controllers do not connect
- SteamVR does not start correctly
- Buying a quality external hard drive: the solution to the bugs?
High-end virtual reality headsets like the HTC Vive offer an impressive immersive experience, to the point of making our brains forget the border between the real and the virtual. Sadly, a bug, failure or other technical problem happened quickly, and the experience can quickly turn into a headache. Here are the solutions to remedy bugs and other concerns of HTC Vive.
HTC Vive is not detected or does not respond
The HTC Vive is more complex to set up than most video game platforms. As a result, many users are faced with hardware issues. Among the most common problems, it is common that the headset is not detected or no longer responds to commands. This issue is reported by an error 108 message or a flashing red light on the headset. Here are the different solutions to remedy it.
Check that all HTC Vive cables are connected

Often times, headphone problems are caused by disconnected components. The various cables and accessories are easily detached, and the connectors have an annoying tendency to pull out when the headset is pulled out.
Check carefully that all cables from the Vive are plugged in, including those that connect the headset to the PC. The power, USB, and HDMI cables to connect the headphones to the link box are often the cause of the problem.
Otherwise, HTC recommends using only the headsets included with HTC Vive. Better to avoid third-party cables to avoid any unexpected problems.
Check the hardware installation of the HTC Vive headset
Given the large number of USB and HDMI connectors to plug in, it is quite possible to make an installation error when making connections. Check that each cable is plugged into the correct port, locating yourself using the orange markers on the link box.
Alternate USB ports to connect the HTC Vive cable

Many tracking and detection problems are linked to the USB port used for the headset. This concern is related to chip issues affecting USB 3.0 and 3.1 ports, affecting data transfer from headset to PC. To remedy this, you can simply try to change the USB port to connect your link box to your PC. HTC recommends using a USB 2.0 port, ensuring a more stable experience despite lower bandwidth.
Restart the HTC Vive headset
If the headset does not respond, a reboot via SteamVR often solves the problem. This technique can also be used to troubleshoot software problems. From the SteamVR desktop application, right click on the helmet image. From the context menu, choose the Reboot option to restart the device.
Restart the computer
If none of the above solutions work, restarting the PC may resolve hardware and software problems. It is also recommended to turn off the headset and lighthouse stations to reset them.
HTC Vive has an audio problem
HTC Vive has its own audio output, and can sometimes experience problems. Fortunately, these problems are often related to a misconfiguration and can be fixed with very simple adjustments. Here are the solutions to apply for the most common problems.
Change SteamVR audio preferences
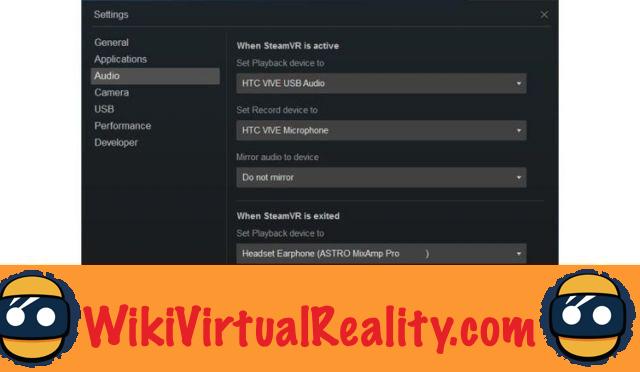
To resolve a possible audio issue, first check the SteamVR audio settings. Open the SteamVR desktop application. Choose the Settings tab, and open the Audio tab. Configure audio preferences, choosing to use the Vive audio output as soon as you launch SteamVR.
Change the default audio device in Windows
If the first solution doesn't fix the problem, change your audio preferences in Windows. Open Windows Sound application, find the HTC-VIVE-X device (X is a number), right-click on this device and set it as the default audio device.

Checking the hardware installation of HTC Vive
Last resort, check that your equipment is installed correctly and that the various connectors are plugged in the right place. Open the compartment housing the various cables on the upper part of the helmet. Make sure the 3,5mm audio cable is securely connected. Also check that all cables are properly connected to the link box. You may want to consider using a USB headset instead of a 3,5mm jack headset.
HTC Vive: tracking of Lighthouse stations does not work correctly
The HTC Vive is one of the only headsets, along with the Oculus Rift, to offer Room Scale functionality. This feature allows to follow all movements and movements of the user within the room. It therefore relies heavily on the tracking capabilities of the device.
This tracking in question works thanks to the lighthouse stations. Therefore, these stations must be configured correctly and placed in an open space to avoid any problems.
Check that your Lighthouse stations are set up correctly

Both stations should be mounted above the user's head level. HTC recommends placing them at a height of more than 2 meters, and orienting them between 30 and 45 degrees downwards for optimal coverage. The firm also recommends spacing them 5 meters apart, without any obstacle in between. An included sync cable can be used to establish manual communication.
Check that Lighthouse stations are installed securely
Check carefully that the two stations are attached for optimal tracking accuracy. Each station has a motor to emit infrared light. This motor may cause movement and impair stability.
The safest way is to use the installation kit included with the Vive. This kit allows the stations to be fixed to the wall while reducing the risk of vibration and falling.
Setting up channels for HTC Vive Lighthouse stations

The tracking information is transmitted directly to the PC through the headset. On the other hand, communication between the two stations is ensured by a very simple installation process. Each station must be assigned to one of the three channels, to be chosen according to the configuration. The channel can be changed through a switch on the back of the station.
Si you are using wireless optical sync between the two stations, one must be on channel B and the other on channel C. If you are using the sync cable between the two stations, one must be on channel A and the other on channel B.
Perform a new HTC Vive gaming space calibration
Un recalibrating the space may resolve tracking issues. If the stations have been moved since the last installation, the calibration may be affected. Redoing the installation may help eliminate such problems. This solution is also suitable for situations in which the ground appears higher or lower than in reality. Be sure to remove any reflective surfaces that may interfere with the distribution of infrared light.
Reduce the camera quality of HTC Vive
After identifying the HTC Vive camera as the cause of many tracking problems, HTC decided to disable this camera by default. Because, transferring high-quality video requires more USB bandwidth, which can affect tracking.
For some users, activating the camera has no consequences. On the other hand, If you encounter a tracking problem after activation, reducing the quality of the camera may free up bandwidth.
Optical synchronization issues between Lighthouse stations
Problems may occur when your Ligthhouse for HTC Vive stations try to sync. To remedy this, first check whether the firmware is updated by going to Also make sure thatNothing obstructs the path between the two stations, so that they can see each other.
Do not move the stations too far from each other. 5 meters is the maximum distance. Check that Lighthouse stations are in the right way by pressing the mode button on the back of the stations. One must be in mode, the other in mode Normally, the LED of the stations must show a green color and not flash.
What do the different colors of the LEDs of the Lightouse stations mean?
The color of the LEDs on Lighthouse stations usually tells you what the problem is. If the diode is blue, this means that the station is struggling to stabilize. Vibration or movement can cause this problem. To solve it, make sure the stations are mounted correctly.
If the diode is green, this means that the stations are in standby mode. To resolve this problem, unplug them and plug them in again. If the LED is purple (fixed or flashing) it means that your stations cannot be seen. Try to remove any obstacles that could obstruct the optical contact between the two stations.
Finally, if the Lighthouse station does not light up, it simply means that it is not receiving electricity. Make sure the power cable is plugged in. If so, try a different electrical outlet.
How do I synchronize Lighthouse stations using a cable?
If you do not have enough space for the two Lighthouse stations to see each other, it is possible to opt for a cable sync. An optional long cable is indeed supplied with the Vive, and you can connect Lighthouse stations using it.
Press the mode button on the back of each station, until one displays the letter and the second displays the letter. If the synchronization is done correctly, the LEDs should now be green and not blinking.
HTC Vive: Vive Wands controllers do not connect
HTC Vive controllers are based on cutting edge technology. It happens that these accessories have synchronization problems, generally related to a bad configuration. Here's how to fix it.
Checking the battery level of HTC Vive controllers
If the controller LED does not light up or flash red, it means recharging is required. It is still possible to connect the controllers, but frequent disconnections will be deplored. Plug your controllers into the wall adapter supplied with the Vive, through the micro-USB port. The LED should turn orange, which means charging is in progress. Once the controller is fully charged, the LED will turn white.
Pair HTC Vive Wands controllers again
If the controller's LED is blue, it means it is trying to connect to the HTC Vive headset. Yes the controller is not paired with a nearby headset, it is common for the headset to get stuck in this state. To resolve the problem, the controllers must be paired again.
Open the SteamVR desktop application menu. See you in Device> Pair a controller. Press and hold the App and System buttons until the device LED flashes blue, signifying that pairing is in progress.
Reset HTC Vive Wands Wands controllers

Il HTC Vive controllers may become unresponsive, and fail to connect to the headset. If a red light appears on the controller, it is best to reset it.
Hold pressed the trigger, the menu button, the click of the trackpad, and the grip buttons simultaneously on the controller that no longer responds. While holding these buttons down, connect the controller to a PC using a micro-USB cable. Wait 5 seconds, and release the buttons. Unplug the cable. The controllers should now function correctly. If none of the above solutions work, consider purchasing a replacement controller.
What do the different colors of the LEDs on Vive Wands controllers correspond to?
The color of the LEDs of the Vive Wands controllers can tell what the problem is if the connection fails. If the LED is blue, this means that the controller is not connected to the PC. You will therefore have to re-pair the controllers by going to
If the LED is red and the controller is not responding, try resetting your controller. To do this, simultaneously squeeze the trigger, menu button, trackpad button and grip buttons. Hold them down while plugging your controller into your PC via microUSB. Wait 5 seconds and release the buttons. Your PC should detect a new storage device. Ignore the message and unplug the controller. Your controller should be reset and functioning properly.
If the Vive Wand controller LED does not display no color, it means that it is not lit. Press the system button to turn it on. If it does not light up, the controller needs to be charged. Plug it into an electrical outlet using the microUSB cable and adapter. When the controllers are loaded, they will display different colors. The orange color means the controller is charged, the green color means it is fully charged is on, and the white light means it is fully charged but turned off.
What if the Vive Wands controllers are too sensitive or not sensitive enough?
If your controller is too sensitive or on the contrary difficult to use, the problem surely stems from the calibration or firmware that needs to be updated. To check if the controller firmware is up to date, go to SteamVR and navigate to SteamVR> Devices> Update Firmware.
If you firmware is up to date, calibrate. Start by turning off the controller by holding down the System button until the LED turns off. Then squeeze and hold the trigger and grip button while pressing the system button. The controller should turn back on and make a different noise than usual.
SteamVR does not start correctly
Launched earlier this year, Valve's SteamVR platform has quickly grown into one of the leading virtual reality application platforms. The once impressive bug list has been greatly reduced. However, SteamVR may have problems starting up. Here's how to fix it.
Launch Steam as an administrator
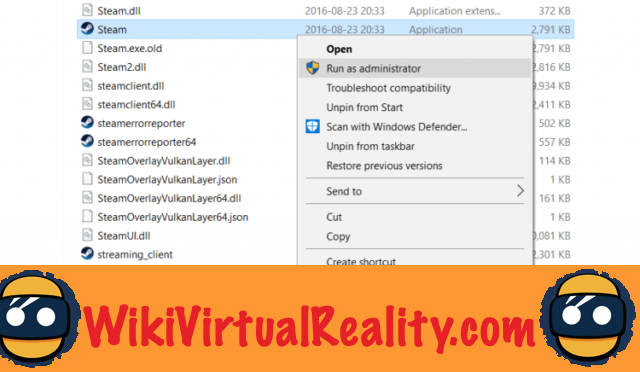
Many issues that SteamVR experiences are related to Steam privileges. To remedy this, simply launch the platform as an administrator. Quit Steam, go to C: / Program Files / Steam, find Steam.exe, right click on the file and choose Run as administrator.
Check the integrity of the SteamVR cache

Often, SteamVR startup issues are related to missing or corrupt files. One missing file is enough to render SteamVR unusable. This problem can however be easily fixed through the Steam client.
Il just check the integrity of the cache and Steam will automatically replace damaged or missing files. Open the Library from the Steam desktop client. Choose the Tools tab. Find the SteamVR tool, right click and choose Properties. Click the Local Files tab, then click Check Cache Integrity.
Reinstall SteamVR
If you are still having problems after checking the integrity of the cache, you may want to reinstall SteamVR. Open the library from the Steam desktop client, choose the Tools tab, find the SteamVR tool, right click and choose Properties. Click on the Local Files tab. Click Remove content from local tools. Double-click on SteamVR in the Tool Library to initiate the reinstallation.
Check for possible software conflicts
SteamVR may conflict with certain software installed on your computer. If you are having trouble with SteamVR, Valve recommends removing the following programs :
- Razer Synapse
- Asus AI Suite
- Avast antivirus
- JDS Labs ODAC USB Audio device
- Older Apple Cinema displays with devices attached through USB
- TP-LINK 300Mbps Wireless N PCI Express Adapter TL-WN881ND
Buying a quality external hard drive: the solution to the bugs?
It would be a shame if, due to lack of space, you can no longer install the games you dream of playing Or that you have to delete some of them to be able to try new experiences. For some hassle-free VR games, remember to get a good external hard drive, which will be used to store your applications or your games.
Un external hard drive is convenient for transferring games that you rarely use. You can play on an external HD without causing any slowdown or bug issues. Previously, an external hard drive had a fairly limited memory, between 120 and 500 GB. So it quickly fills to the brim. But to overcome this problem, manufacturers have designed external hard drives with storage capacities of 1 TB and more.
It is more practical to invest in an external hard drive, than to increase the internal storage of your machine. You can install all the games you want without losing your data present in the hard drive. In addition, a new internal drive will require you to reinstall your games and updates, add-ons, backups, etc. However, prefer an external hard drive with mains power to one that is self-powered.

![[GOOD TIP] The DJI Mavic Air drone at only 970 euros 🔥](/images/posts/508c7088bbc439b2faabf0ee3721dc83-0.jpg)
![[WWDC 2017] Mac VR: Apple computers running macOS High Sierra compatible with HTC Vive](/images/posts/1efe8a66c6dc80ec888133efad603474-0.jpg)
![[Review] Augmented Empire - A fascinating cyberpunk tactical RPG on Samsung Gear VR](/images/posts/e59f79c2980c7163a7cfe93c1a40e553-0.jpg)